Nearly every aspect of our professional and personal lives involve technology and electronic communications. Staying safe in an ever changing digital world is a daily battle that we all play a vital role in. You are part of the front line of defense at LLCC, and we all make a difference keeping our network, programs, data and resources safe from attack, damage and/or unauthorized access. Learn more about phishing on the Cybersecurity portal page.
The following three steps — Stop, Read, Act — can make a tremendous impact on staying safe.
Stop — if you receive a suspicious looking email. They may be asking you for personal or account information, to reset your password and/or access documents.
Read — look at the email carefully. Are you expecting an email or documents to be sent to you, do you recognize the sender of the email, does the email address match the sender’s name or look off, are there links for you to click on in the meeting? Hover your mouse over the email sender’s name, if not shown and any links within the message to verify the content. Never click on any of the active links unless you are 100% sure they are legitimate.
Act — Report the message via your Outlook desktop app or Outlook 365 with the built-in feature. You do not need to forward this onto the Helpdesk or call. The most efficient and fastest way to notify IT is the Report the Message as Phishing feature.
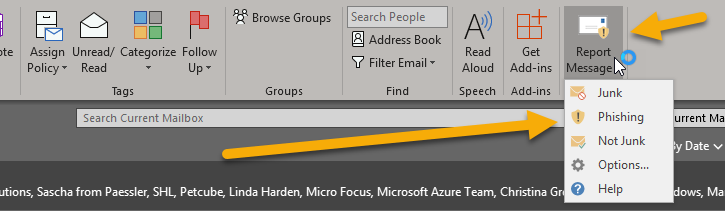
Outlook Desktop
With the message selected, click on Report Message in the Ribbon. Select Phishing. The malicious email will be reported directly to Microsoft. Reporting malicious and unsolicited emails makes LLCC’s email filtering system more effective.
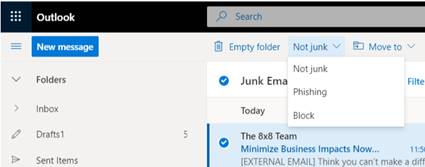
Outlook 365
Select the email from the list, and click on the Not Junk drop-down arrow. Select Phishing. The malicious email will be reported directly to Microsoft. Reporting malicious and unsolicited emails makes LLCC’s email filtering system more effective.
When in doubt, report! Should you need any assistance with a suspicious email, please contact the IT Help Desk at helpme@llcc.edu or 786-2555.

 While participating in a Teams meeting via audio or video, you can take notes. These notes are saved within the meeting history, as well as any chat conversations and shared documents.